

搜索到
54
篇与
的结果
-
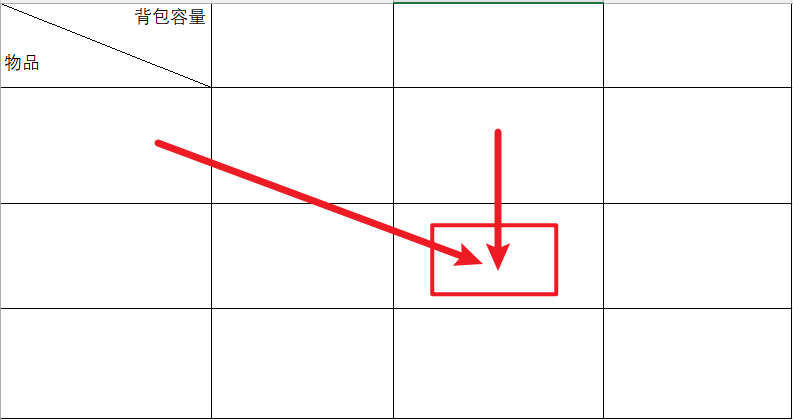
 背包问题算法 01背包问题01背包是一种动态规划问题。动态规划的核心就是状态转移方程有一个容量为V的背包,还有n个物体。现在忽略物体实际几何形状,我们认为只要背包的剩余容量大于等于物体体积,那就可以装进背包里。每个物体都有两个属性,即体积w和价值v。 问:如何向背包装物体才能使背包中物体的总价值最大?二维数组解法f[i][j] = max(f[i - 1][j], f[i - 1][j - w[i]] + v[j])i:选用前i种物品j:背包容量为jdp[i][j] 表示从下标为[0,i]的物品里任意取,放进容量为j的背包,价值总和最大是多少。for (int j = 0 ; j < weight[0]; j++) { // 如果把dp数组预先初始化为0了,这一步就可以省略。 dp[0][j] = 0; } // 正序遍历 for (int j = weight[0]; j <= bagWeight; j++) { dp[0][j] = value[0]; }有两个遍历维度:1. 物品和背包容量。 2. 所以要确定遍历顺序。两者都可以,先遍历物品好理解。先遍历物品,然后遍历背包重量:// weight数组的大小 就是物品个数 for(int i = 1; i < weight.size(); i++) { // 遍历物品 for(int j = 0; j <= bagWeight; j++) { // 遍历背包容量 if (j < weight[i]) dp[i][j] = dp[i - 1][j]; // 如果不能放下物品i else dp[i][j] = max(dp[i - 1][j], dp[i - 1][j - weight[i]] + value[i]); } } 先遍历背包,再遍历物品:// weight数组的大小就是物品个数 for(int j = 0; j <= bagWeight; j++) { // 遍历背包容量 for(int i = 1; i < weight.size(); i++) { // 遍历物品 if (j < weight[i]) dp[i][j] = dp[i - 1][j]; else dp[i][j] = max(dp[i - 1][j], dp[i - 1][j - weight[i]] + value[i]); } }为什么两种顺序都可以?要理解递归的本质和递推的方向。那么先遍历物品,再遍历背包的过程和先遍历背包,再遍历物品,dp[i][j]所需要的数据就是左上角,根本不影响dp[i][j]公式的推导。一维dp数组解决01背包问题dp[j] = max(dp[j], dp[j - weight[i]] + value[i]);一维dp数组如何初始化dp[j]表示:容量为j的背包,所背的物品价值可以最大为dp[j],那么dp[0]就应该是0,因为背包容量为0所背的物品的最大价值就是0。假设物品价值都是大于0的,所以dp数组初始化的时候,都初始为0就可以了。一维dp数组遍历顺序for(int i = 0; i < weight.size(); i++) { // 遍历物品 for(int j = bagWeight; j >= weight[i]; j--) { // 遍历背包容量 dp[j] = max(dp[j], dp[j - weight[i]] + value[i]); } }在01背包中二维dp数组的两个for遍历的先后循序是可以颠倒,一维dp数组的两个for循环先后循序一定是先遍历物品,再遍历背包容量。和二维dp的写法中,遍历背包的顺序是不一样的!一维dp遍历的时候,背包容量是从大到小:倒序遍历是为了保证物品i只被放入一次!为什么一维dp数组必须倒序遍历:如图,红线为数据更新来源,蓝线数据更新顺序:当前状态源于左上角和同背包容量方向如果先遍历物品再遍历背包且正序遍历,就会使一些同背包容量方向的数据被覆盖掉。如果先遍历背包再遍历物品,完全背包问题完全背包依然是一个动态规划问题有N件物品和一个最多能背重量为W的背包。第i件物品的重量是weight[i],得到的价值是value[i] 。每件物品都有无限个(也就是可以放入背包多次),求解将哪些物品装入背包里物品价值总和最大。完全背包和01背包问题唯一不同的地方就是,每种物品有无限件。01背包和完全背包唯一不同就是体现在遍历顺序上,所以针对遍历顺序进行分析。// 先遍历物品,再遍历背包 int[] dp = new int[bagWeight + 1]; for (int i = 0; i < weight.length; i++){ for (int j = 1; j <= bagWeight; j++){ if (j - weight[i] >= 0){ dp[j] = Math.max(dp[j], dp[j - weight[i]] + value[i]); } } }为什么遍历物品在外层循环,遍历背包容量在内层循环?在01背包中二维dp数组的两个for遍历的先后循序是可以颠倒,一维dp数组的两个for循环先后循序一定是先遍历物品,再遍历背包容量。在完全背包中,对于一维dp数组来说,其实两个for循环嵌套顺序无所谓:因为物品可以重复装。也就是说dp[j]是根据下标j之前所对应的dp[j]计算出来的。 只要保证下标j之前的dp[j]都是经过计算的就可以。完全背包中,两个for循环的先后循序,都不影响计算dp[j]所需要的值。为什么是正序遍历而不是倒序遍历了?因为在完全背包中,由于物品可以重复装填,那么就需要相同物品在不同背包容量时重复利用前面的数据。先遍历背包再遍历物品:// 先遍历背包,再遍历物品 for(int j = 0; j <= bagWeight; j++) { // 遍历背包容量 for(int i = 0; i < weight.size(); i++) { // 遍历物品 if (j - weight[i] >= 0) dp[j] = max(dp[j], dp[j - weight[i]] + value[i]); } }先遍历物品,再遍历背包:// 先遍历物品,再遍历背包 int[] dp = new int[bagWeight + 1]; for (int i = 0; i < weight.length; i++){ for (int j = 1; j <= bagWeight; j++){ if (j - weight[i] >= 0){ dp[j] = Math.max(dp[j], dp[j - weight[i]] + value[i]); } } }连续背包问题连续背包问题是指有一个容量为V的背包和n个物品,每个物品有一个体积v [i]和一个价值w [i],现在要将这些物品放入背包中,使得背包中物品的总价值最大。 与0/1背包问题不同的是,每个物品可以被放入多次,即是连续的。解题思路:单位价值优先使用贪心算法① 按价值密度(w/v)进行非递增排序② 按照排序先后,往里装。单个物品装完时换下一个,直到背包填满为止
 -
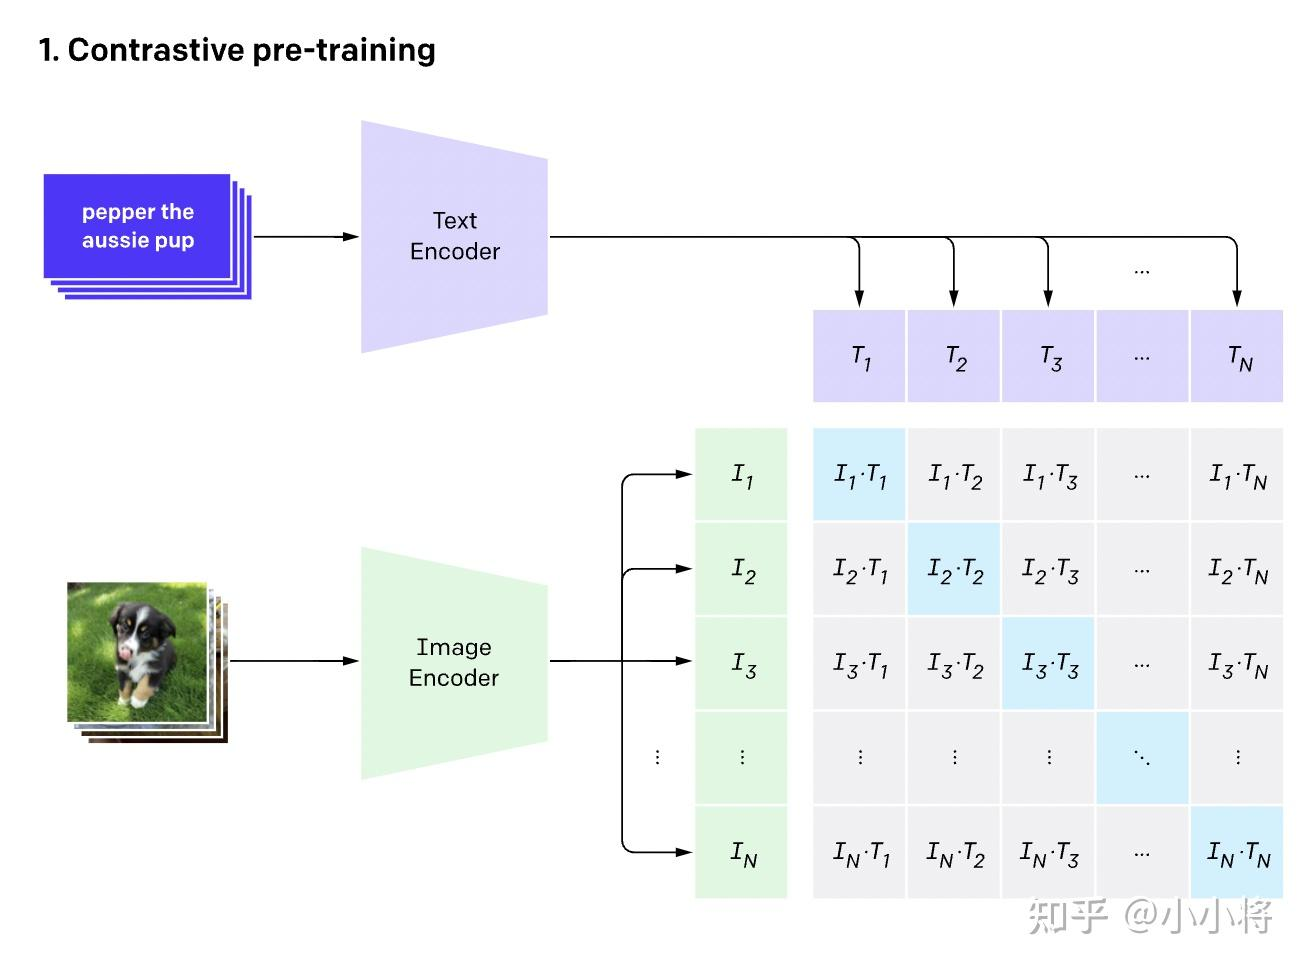
多模态初探——驾驶汽车虚拟仿真视频数据理解 近期Datawhale组织了《2023全球智能汽车AI挑战赛——赛道二:智能驾驶汽车虚拟仿真视频数据理解赛道》比赛的赛事实践活动赛题:智能驾驶汽车虚拟仿真视频数据理解赛道任务:输入:元宇宙仿真平台生成的前视摄像头虚拟视频数据(8-10秒左右);输出:对视频中的信息进行综合理解,以指定的json文件格式,按照数据说明中的关键词(key)填充描述型的文本信息(value,中文/英文均可以);baseline理解CLIPbaseline主要采用了CLIP模型:CLIP是用文本作为监督信号来训练可迁移的视觉模型,特此学习一下CLIPCLIP参考资料:https://zhuanlan.zhihu.com/p/493489688How CLIP WorksCLIP是一种基于对比学习的多模态模型,与CV中的一些对比学习方法如moco和simclr不同的是,CLIP的训练数据是文本-图像对:(Text, Img)一张图像和它对应的文本描述,这里希望通过对比学习,模型能够学习到文本-图像对的匹配关系。如下图所示,CLIP包括两个模型:Text Encoder和Image Encoder,其中Text Encoder用来提取文本的特征,可以采用NLP中常用的text transformer模型;而Image Encoder用来提取图像的特征,可以采用常用CNN模型或者vision transformer。Text Encoder:text transformerImage Encoder: CNN or vision transformer这里对提取的文本特征和图像特征进行对比学习。对于一个包含N个文本-图像对的训练batch,将N个文本特征和N个图像特征两两组合,CLIP模型会预测出N²个可能的文本-图像对的相似度,这里的相似度直接计算文本特征和图像特征的余弦相似性(cosine similarity),即上图所示的矩阵。这里共有N个正样本,即真正属于一对的文本和图像(矩阵中的对角线元素),而剩余的N²−N个文本-图像对为负样本,那么CLIP的训练目标就是最大N个正样本的相似度,同时最小化N²−N个负样本的相似度How to zero-shot by CLIP与YOLO中使用的先预训练然后微调不同,CLIP可以直接实现zero-shot的图像分类,即不需要任何训练数据,就能在某个具体下游任务上实现分类根据任务的分类标签构建每个类别的描述文本:A photo of {label},然后将这些文本送入Text Encoder得到对应的文本特征,如果类别数目为N,那么将得到N个文本特征;将要预测的图像送入Image Encoder得到图像特征,然后与N个文本特征计算缩放的余弦相似度(和训练过程一致),然后选择相似度最大的文本对应的类别作为图像分类预测结果,进一步地,可以将这些相似度看成logits,送入softmax后可以到每个类别的预测概率在飞桨平台使用CLIP# 由于在平台没有默认安装CLIP模块,故需要先执行安装命令 !pip install paddleclip# 安装完后直接通过clip导入 from clip import tokenize, load_model # 载入预训练模型 model, transforms = load_model('ViT_B_32', pretrained=True)Pillow和OpenCV由于在之前仅仅接触过几次cv2和pil,都是直接从网上搜完代码直接调用的,没有深入里结果里面的具体含义,这次借着本次组队学习的机会,系统梳理一下cv2和pil的API先来看下本次baseline所用到的APIPIL# 导入pillow库中的Image from PIL import Image # 读入文件后是PIL类型(RGB) img = Image.open("zwk.png") # 补充:pytorch的顺序是(batch,c,h,w),tensorflow、numpy中是(batch,h,w,c)cv2# 导入cv2 import cv2 # 连接摄像头或读取视频文件,传入数字n代表第n号摄像头(从0开始),传入路径读取视频文件 cap = cv2.VideoCapture() # 按帧读取视频,ret为bool,frame为帧 ret, frame = cap.read() # 获取总帧数 cap.get(cv2.CAP_PROP_FRAME_COUNT) # 如果要抄中间的帧,需要先跳转到指定位置 cap.set(cv2.CAP_PROP_POS_FRAMES, n) # 由于cv2读取的图片默认BGR,而模型需要传入标准的RGB形式图片 image = cv2.cvtColor(img, cv2.COLOR_BGR2RGB) # 色彩通道转换:BGR -> RGB改进将需要预测的keywords改为["weather", "road_structure", "period", 'scerario'],可以使分数从93提升到119,看来CLIP对于识别一些诸如天气环境等静态信息还是比较有优势的。修改抽帧位置,但没有改进,可以再次尝试抽取多帧进行投票。(其实还试过切换为GPU,把整个视频所有帧都抽出来组成一个batch放进去计算整体概率,但是效果也不好)frame_count = int(cap.get(cv2.CAP_PROP_FRAME_COUNT)) # 获取视频总帧数 middle_frame_index = frame_count // 2 cap.set(cv2.CAP_PROP_POS_FRAMES, middle_frame_index) # 设置跳转当前位置到中间帧
-
使用亚马逊云科技服务器进行深度学习AI项目的线上部署 什么是Mutual AI?Mutual AI是一个致力于在人工智能新时代提供中文交互式科普的开源项目。项目目标:解决当前人工智能领域中机器学习和深度学习算法学习过程中的理论知识枯燥难懂的问题。解决初学者在实际操作过程中遇到的"黑匣子问题"。开源地址:YinHan-Zhang/Mutual-AI: Mutal Artificial Intelligence Project for novicies friendly (github.com)使用亚马逊云科技服务器进行线上搭建亚马逊云科技(Amazon Web Services,AWS)是全球领先的云计算服务提供商之一,为个人、企业和组织提供可靠的、灵活的和安全的云计算平台。其中,弹性云服务器Amazon EC2作为AWS的核心服务之一,提供了丰富的实例类型和配置选项,适用于各种不同规模和类型的应用需求本例程采用亚马逊云科技的弹性云服务器Amazon EC2进行部署了解更多购买信息:云主机_云服务器_Amazon EC2云虚拟服务器-亚马逊云科技 (amazonaws.cn)Amazon EC2提供安全、弹性、高可用的云服务器,随时启动,无需预先付费。它提供多种实例类型,包括通用型实例、计算优化实例、内存优化实例和存储优化实例,适用于各种不同的应用需求。Amazon EC2提供了以下不同类型的实例:`通用型实例:提供了平衡的计算、内存和网络资源,适用于大多数工作负载。计算优化实例:专注于提供高性能计算能力,适用于需要处理大量计算任务的应用,比如机器学习和高性能计算(HPC)。内存优化实例:针对内存密集型应用,提供大量的内存资源,能够支持处理大规模数据和内存密集型工作负载。存储优化实例:专注于提供高性能的存储系统,适用于需要处理大量存储和数据库操作的应用。除了常规实例外,亚马逊云还提供了加速计算实例,例如P3型实例,具备强大的处理能力和高速网络传输性能。本项目就采用了其中的P3型,配置如下:{callout color="#f0ad4e"}至多96 vCPU,768 GiB 内存多达 8 个 NVIDIA Tesla V100 GPU,各配有 5120 个 CUDA 核心和 640 个 Tensor 核心支持通过 NVLink 进行对等 GPU 通信提供高达 100Gbps 的聚合网络带宽{/callout}得益于AWS(亚马逊云)的高性能加速计算实例,可以使如此复杂的深度学习模型部署在线上部署运行环境准备本项目需要Python环境进行部署,其中Python3.9的编译安装教程请见:Linux编译安装Python3.9——以CentOS7为例 - MoyiTech的小站-IT博客-Maker BLOG (9998k.cn)其余模块已保存在requirements.txt,可使用pip进行快速安装Python 3.9Fastapi >=0.95.1Pillow >=9.4.0Torchvision >=0.15.0Torch >=2.0.0Torchaudio >=0.0.0Python-MultipartUvicorntensorflow >=2.12.0程序运行详细步骤克隆项目到本地git clone https://github.com/YinHan-Zhang/Mutual-AI使用pip安装Python依赖文件pip install -r requirements到项目文件夹,使用 uvicorn 运行程序uvicorn main:app搭建成功啦!打开网址 http://IP:8000/即可访问
-
Mind2Web: Towards a Generalist Agent for the Web 论文解读 主页:https://osu-nlp-group.github.io/Mind2Web训练集:https://huggingface.co/datasets/osunlp/Mind2Web概要本文介绍了一个名为MIND2WEB的数据集,用于开发和评估Web通用代理,可以使用自然语言输入指令,使之可以在任何复杂的网站上执行操作。对比前人缺陷:现有的用于Web代理的数据集要么使用模拟网站,要么仅涵盖有限的网站和任务集,因此不适用于通用的Web代理。本文优势:MIND2WEB数据集包含来自137个网站、跨足31个领域的超过2,000个开放式任务,以及为这些任务收集的众包行动序列。MIND2WEB为构建通用Web代理提供了三个必要的要素:多样化的领域、网站和任务使用真实世界的网站而不是模拟和简化的网站广泛的用户交互模式。基于MIND2WEB,作者进行了首次尝试使用大型语言模型(LLMs)构建通用Web代理。由于真实世界网站的原始HTML通常元素过多无法直接输入LLM,本文的方案为:先通过小型LM进行筛选,再输入到LLM中,可以显著提升模型的效果和效率。MIND2WEB 数据集介绍来自于真实网站的捕捉涵盖领域广网站的快照和交互捕获完全任务定义该数据集旨在使代理通过一系列操作完成特定任务任务描述:是高级的,而不是避免了低级的、一步一步的指令。操作序列:(目标元素,操作)->(目标元素,操作)-> ... ->(目标元素,操作)三种常见操作:点击(包括悬停和按回车)、输入、选择操作序列通常跨越一个站点的多个网页。网页快照:HTML、DOM、HAR等过程信息执行方式:逐步预测、执行,input:当前网页、历史操作,output:接下来的操作 (有RNN的意思)数据收集数据通过亚马逊众包平台(Amazon Mechanical Turk)收集,主要分为三个阶段:第一阶段-任务提出:首先要求工作者提出可以在给定网站上执行的任务。作者会仔细审核提出的任务,并选择在第二阶段进行注释的可行且有趣的任务。第二阶段-任务演示:要求工作者演示如何在网站上执行任务。使用 Playwright 开发了一个注释工具,记录交互跟踪并在每个步骤中对网页进行快照。如图 2 所示,用红色标记的操作将导致转换到新网页。第三阶段-任务验证:作者验证所有任务,以确保所有操作都是正确的,任务描述正确地反映了注释的操作。与前人的比较 及 研究挑战采用真实的网页,更符合实际网页元素多、复杂度高,未进行人工简化任务等级高,更接近日常使用先前的研究通常提供逐步的指令,并主要关注测试代理将低级指令转化为操作的能力,例如,“在位置字段中输入纽约,单击搜索按钮并选择明天标签”本文数据集只提供高级目标,例如,“纽约明天的天气如何?”故这种数据集(Mind2Web)对于代理模型的训练及应用来说提出了很大的挑战。MindAct 框架为了使用Mind2Web数据集,引入了MindAct框架由于原始HTML过大,直接输入到LLM中消耗资源过大,MindAct将此分为二阶段过程(如图三)第一阶段:如图四,使用一个Small LM,从HTML中元素中筛选出几个候选元素第二阶段:将候选元素合并成HTML片段传入到LLM进行最后预测(元素 + 操作)Small LM 用于筛选;LLM用于预测通过Small LM生成小模型feature: Task Description + Previous Actionstarget: Top-k Elements通过LLM预测操作LLM用于判别 比 生成更有效率故LM被训练为从一系列选项中进行选择,而不是生成完整的目标元素Divide the top-k candidates into multiple clusters of five options. If more than one option is selected after a round,Form new groups with the selected ones. This process repeats until a single element is selected, or alloptions are rejected by the modeltest result:为什么MindAct和两个baseline不使用相同的LLM以控制变量?baseline1: Classfication,仅使用Debertab进行 元素 预测baseline2: Generation,使用Flan-T5直接进行 元素+操作 的预测实验实验步骤Test-Cross-Domain:使用不同的域名进行预测Test-Cross-Website:使用同域的网站预测TestCross-Task:使用相同的网站预测数据预处理和评估分别使用Element Accuracy、Operation F1、Step Success Rate、Success Rate对数据进行评估实验结果第一步候选生成使用了微调的DeBERTa 作为Small LM,用于第一步的候选生成(For efficiency, use the base version DeBERTaB with 86M parameters.)分别获得了88.9% / 85.3% / 85.7% 的recall取k=50,即top-50用于下一步预测。第二步操作预测使用Flan-T5作为生成模型尽管是大模型(220M for Flan-T5),但在元素选择方面表现先不佳使用上述MindAct中使用的multi-choice QA formulation方法很有效The best model achieves 52.0% step success rate under Cross-Task setting, and 38.9% / 39.6% when generalizing to unseen websites(Cross-Website) and domains(Cross-Domain).However, the overall task success rate remains low for all models, as the agent often commits at least one error step in most cases.Three Levels of Generalization模型均在Cross-Task表现最佳、但在Cross-Website、Cross-Domain中低于Cross-Task 10%以上。由此可见,对于未见过的环境进行预测是目前最大的问题。在图6中可见,Cross-Website、Cross-Domain中的表现很相近。就此可推断,首要问题在于网站的设计和交互逻辑、而不是域名特性。对于网站之间的一些共同的操作,预训练语言模型已经有了可以解析复杂任务的能力。在具体环境中,将这些知识转化为可操作的步骤仍然是一个相当大的挑战。In-context Learning with LLM分别使用MINDACT的方法在GPT-3.5和GPT-4进行了测试,结果如下:GPT-3.5表现不好,在元素选择正确率上仅有20%GPT-4要稍好一些,与微调过的Flan-T5不相上下,表明用大语言模型在此有很大的潜力但GPT-4运行成本很高,使用较小规模的模型是一个很好的发展方向
-
AI线上部署之ChatGLM 使用趋动云的在线Jupyter Notebook部署模型环境配置很简单,直接使用预置的镜像即可环境:Python 3PyTorch代码 + 注释:# cli_demo.py import os import platform import signal from transformers import AutoTokenizer, AutoModel import readline # 从指定路径加载预训练的tokenizer和model,允许信任远程代码 tokenizer = AutoTokenizer.from_pretrained("/gemini/data-2", trust_remote_code=True) model = AutoModel.from_pretrained("/gemini/data-2", trust_remote_code=True).cuda() # 若要支持多显卡,请使用下面两行代码替换上面一行,并根据实际显卡数量设置num_gpus # from utils import load_model_on_gpus # model = load_model_on_gpus("THUDM/chatglm2-6b", num_gpus=2) model = model.eval() # 获取操作系统信息,以便在不同操作系统上清屏 os_name = platform.system() clear_command = 'cls' if os_name == 'Windows' else 'clear' stop_stream = False # 构建用户提示信息,包括对话历史、清空历史和终止程序的说明 def build_prompt(history): prompt = "欢迎使用 ChatGLM2-6B 模型,输入内容即可进行对话,clear 清空对话历史,stop 终止程序" for query, response in history: prompt += f"\n\n用户:{query}" prompt += f"\n\nChatGLM2-6B:{response}" return prompt # 处理终止信号的函数 def signal_handler(signal, frame): global stop_stream stop_stream = True # 主函数 def main(): past_key_values, history = None, [] global stop_stream print("欢迎使用 ChatGLM2-6B 模型,输入内容即可进行对话,clear 清空对话历史,stop 终止程序") while True: query = input("\n用户:") if query.strip() == "stop": # 如果用户输入"stop",退出程序 break if query.strip() == "clear": # 如果用户输入"clear",清空对话历史并清屏 past_key_values, history = None, [] os.system(clear_command) print("欢迎使用 ChatGLM2-6B 模型,输入内容即可进行对话,clear 清空对话历史,stop 终止程序") continue print("\nChatGLM:", end="") current_length = 0 # 使用模型进行对话生成 for response, history, past_key_values in model.stream_chat(tokenizer, query, history=history, past_key_values=past_key_values, return_past_key_values=True): if stop_stream: # 如果接收到终止信号,停止对话生成 stop_stream = False break else: print(response[current_length:], end="", flush=True) current_length = len(response) print("") if __name__ == "__main__": main() 命令行模式命令:python ChatGLM2-6B/cli_demo.py最终结果:web模式:需要安装streamlitpip install streamlit然后在命令行使用streamlit运行web_demo2.pystreamlit run web_demo2.py --server.port=77使用streamlit可以很方便地实现web界面,无需html、css、js的知识都可以用 https://zhuanlan.zhihu.com/p/448853407